Space Patrol Orion
Subtitles Howto, Part 2
You will need an additional piece of freeware / shareware, so you should download and install the following program:
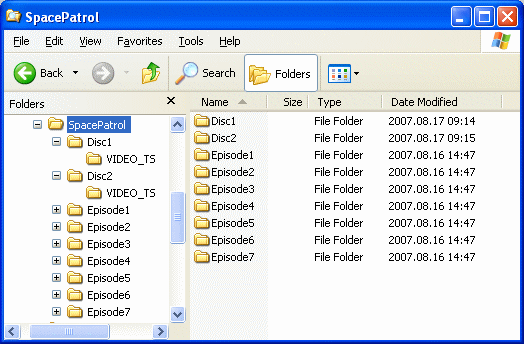
You will also need some more disc space, perhaps 15-20 GB on top of what was already used in part 1. If you're short on disc space, you may delete the .m2v and .ac3-files in the Episode1 through 7 folders.In part one, we created a master directory called SpacePatrol with seven subdirectories, one for each episode. Now, create two more subdirectories called Disc1 and Disc2, and under each of them a VIDEO_TS subdirectory for the finished DVDs. This is what it should look like:
Insert the first disc of the original German DVD-set in your drive. Launch the VobBlanker program, and select input video manager file (1) and output folder (2). The input should be the master IFO-file on the original DVD (drive letter:\VIDEO_TS\VIDEO_TS.IFO). The output folder should be c:\SpacePatrol\Disc1\VIDEO_TS if you've created the directory structure according to the template above.
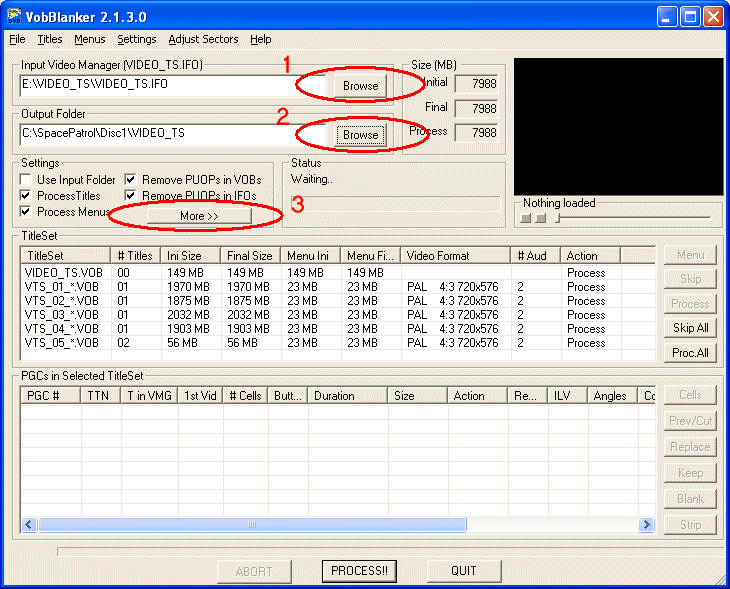
Click the More >> button (3).
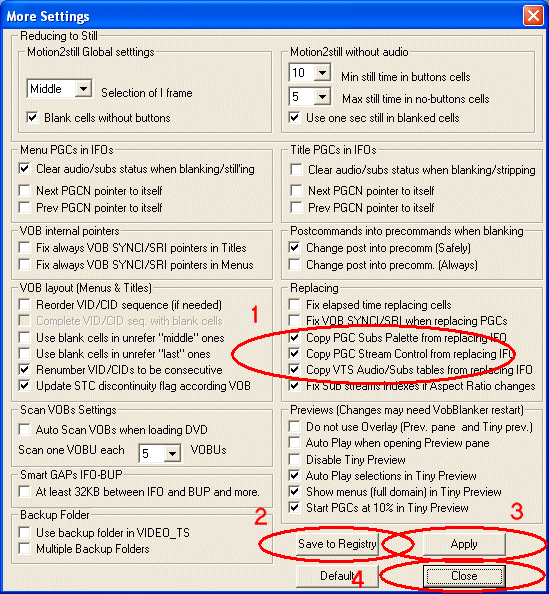
Check Copy PGC Subs Palette from replacing IFO, Copy PGC Stream Control from replacing IFO, and Copy VTS Audio/Subs tables from replacing IFO (1).
Click Save to Registry (2), click Apply (3) and click Close (4).
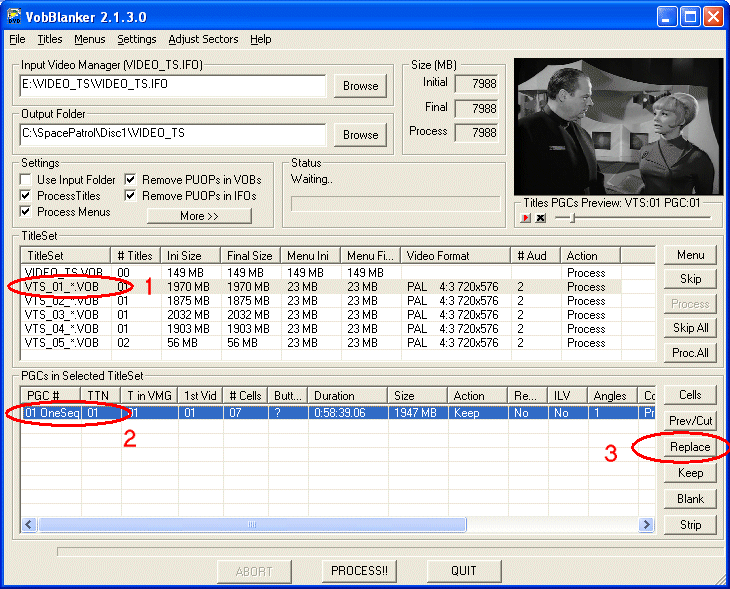
In the list of title sets, click on VTS_01_*.VOB (1). That will bring up a new list of program chains ("PGCs in Selected TitleSet"), in this case containing only one entry. Click on that entry (2). Click on the Replace-button (3) and select the VTS_01_0.IFO file in the C:\SpacePatrol\Episode1\VIDEO_TS directory. (N.B. Not the VIDEO_TS.IFO-file!) In the Action column, note that "Keep" has changed to "Replace".
Now repeat the procedure for episode 2: Click on VTS_02_*.VOB. In the list of title sets, click on the one and only entry, followed by the Replace-button. Select the VTS_01_0.IFO file from the C:\SpacePatrol\Episode2\VIDEO_TS directory. (N.B. Not the VIDEO_TS.IFO-file!) Once again you should see that "Keep" has changed to "Replace".
Repeat the procedure two more times, replacing the VTS_03_*.VOB with the VTS_01_0.IFO-file from the Episode3-directory, and VTS_04_*.VOB with the VTS_01_0.IFO-file from the Episode4-directory.
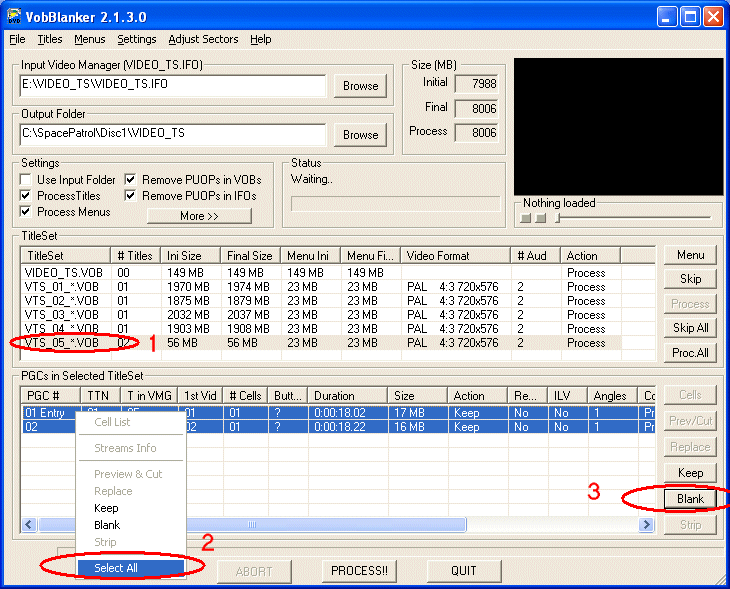
Now, here's an optional step that you can take to remove the two short introductory sequences that play every time you insert the DVD. ("Freigegeben ab 12 Jahren" and the EuroVideo studio logo). In the list of title sets, click on VTS_05_*.VOB (1). Right-click on any one of the two entries in the title set list, and choose Select All (2). Click on the Blank-button (3).

Before proceeding, you may want to save the project using File / Save Project (1). Then click the PROCESS!!-button (2), and watch the program work. When finished, you should have a complete subtitled copy of the first disc in your C:\SpacePatrol\Episode1\VIDEO_TS-folder, including all the menus.
Now you're ready to check the results with almost any PC-based DVD-player (PowerDVD, WinDVD, etc.). You can also burn a DVD if you've got a double layer DVD-burner and 8.5 GB discs to go with it.
If you're happy with the results, you can now move on to disc 2. Insert the second disc of the original German DVD-set in your drive. Launch the VobBlanker program, and select input video manager file and output folder. The input should be the master IFO-file on the original DVD (drive letter:\VIDEO_TS\VIDEO_TS.IFO). The output folder should be c:\SpacePatrol\Disc2\VIDEO_TS.
Click on More >> and make sure that the appropriate check-marks are still there.
Using the same procedure as before, replace the VTS_01_*.VOB with the VTS_01_0.IFO-file from your Episode5-directory, VTS_02_*.VOB with the VTS_01_0.IFO-file from your Episode6-directory and VTS_03_*.VOB with the VTS_01_0.IFO-file from your Episode7-directory.
If you'd like to remove the "Freigegeben ab 12 Jahren" sequence and the EuroVideo studio logo, click on the VTS_06_*.VOB title set, and set both program chains to Blank.
Save the project, then click the PROCESS!!-button.
Now you're ready to check the results with almost any PC-based DVD-player (PowerDVD, WinDVD, etc.) and optionally burn a double layer DVD.
Go back to Space Patrol Orion Subtitles Main Page.
Go back to Part 1.
Webmonster: Anders M Olsson
Page updated 2007-09-02