Space Patrol Orion
Subtitles Howto, Part 3
You will need two additional pieces of freeware / shareware, so you should download and install the following programs:
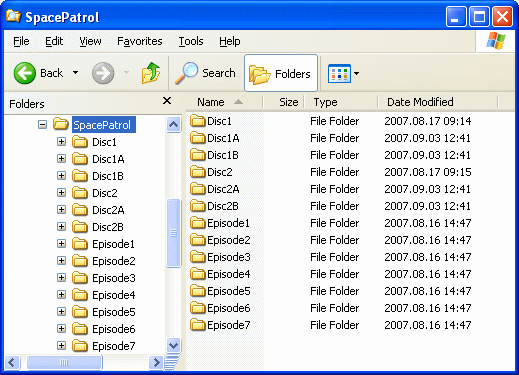
Once again you will need some more disc space. If that's a problem, you may now delete the seven episode folders Episode1 through Episode7.In part one, we created a master directory called SpacePatrol with seven subdirectories, one for each episode. In part two, we created the Disc1 and Disc2 subdirectories with subtitled copies of the original DVDs. We now need two extra copies of each of the Disc1 and Disc2 folders. Using copy and paste, make two copies of the complete Disc1 folder, and rename them Disc1A and Disc1B. In the same way, make two copies of the complete Disc2 folder, and rename them Disc2A and Disc2B. When you're done, it should look something like this:
Let's strip down the contents of each of the four new directories. The basic procedure for each directory goes like this:
- Download and extract the pre-configured menu- and command files.
- Launch PgcEdit and open the VIDEO_TS folder of the directory you wish to strip down.
- Import the pre-configured menu-file for that directory (with extension .but).
- Import all the PGC-commands for that directory (with extension .pgc).
- Delete all uncalled title sets.
- Exit PgcEdit and delete all the backup folders that PgcEdit created.
- Burn the directory contents to a DVD.
Preparing Disc1A
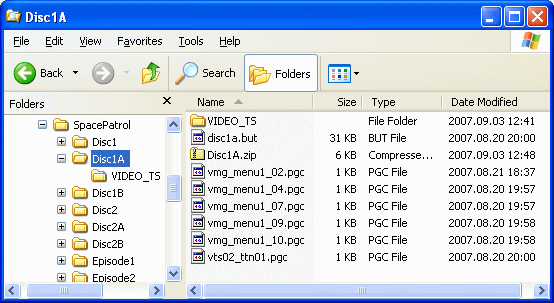
As we begin, the Disc1A folder should contain a complete copy of the first Space Patrol Orion DVD with the first four subtitled episodes. We will now strip it down to include only episodes one and two.Download the zip-archive Disc1A.zip and extract its contents into the Disc1A folder.
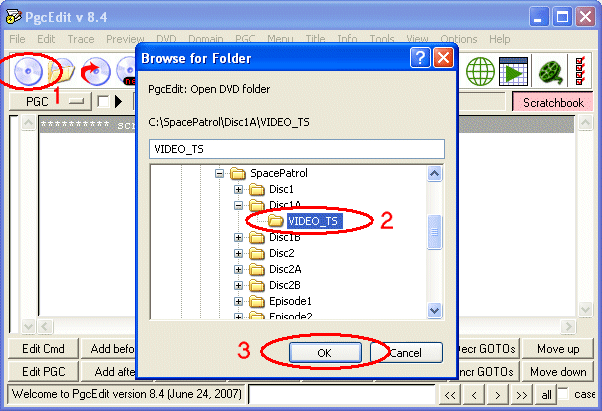
Click the Open DVD button (1), navigate to C:\SpacePatrol\Disc1A\VIDEO_TS (2) and click OK (3).
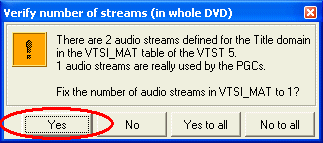
Click Yes if you get a message about "number of audio streams".
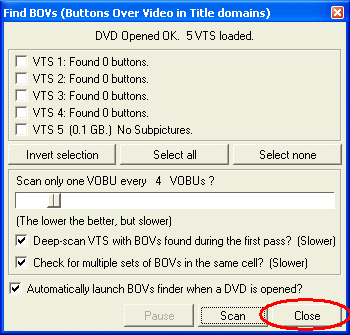
Wait for the BOVs finder to finish, then click Close.
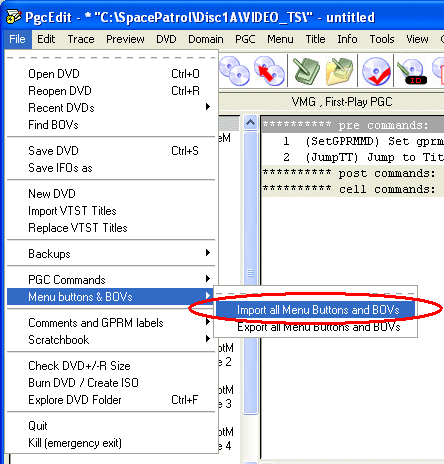
In the File menu select Menu buttons & BOVs / Import all Menu Buttons and BOVs.
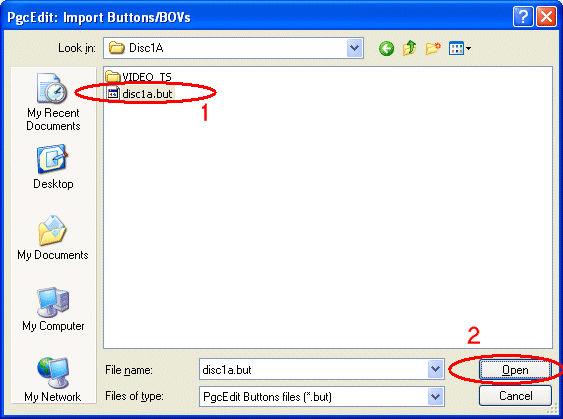
Navigate to C:\SpacePatrol\Disc1A\disc1a.but (1) and click Open (2).
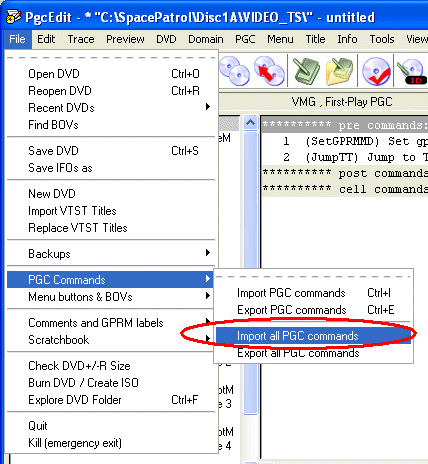
In the File menu select PGC Commands / Import all PGC commands.
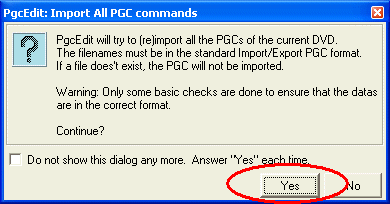
Click Yes to acknowledge the warning message.
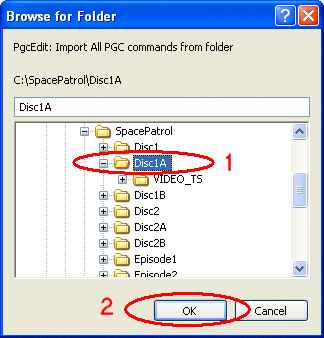
Navigate to the C:\SpacePatrol\Disc1A (1) folder and click OK (2).
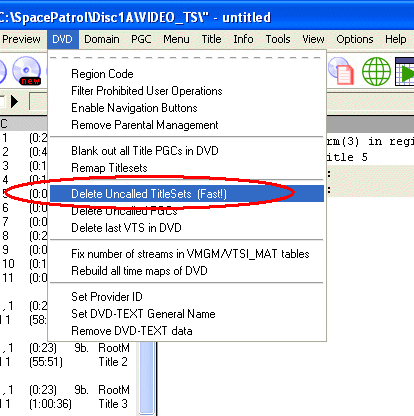
In the DVD menu select Delete Uncalled TitleSets (Fast!).

If you have done everything correctly, PgcEdit will volunteer to delete two titlesets, numbers 3 and 4. If things don't look exactly as above, go back and check that you haven't left out any steps of the procedure. If everything looks fine, click OK.
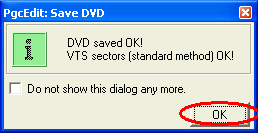
Click OK to acknowledge the progress message.
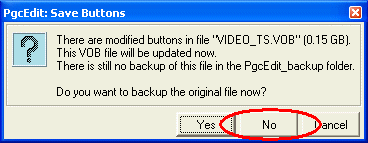
You will now get a series of messages asking about backup of the .VOB-files. There shouldn't be any reason to back things up here, so click No in response to each message.
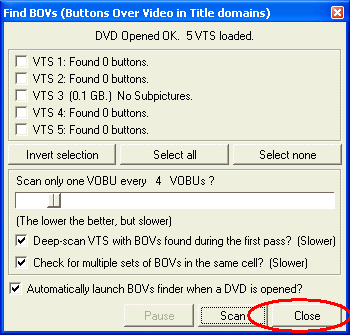
Wait for the BOVs finder to finish, then click Close.
Click OK to acknowledge the progress message. You may now close the PgcEdit program. We're almost done, and you may want to check the results with some PC-based DVD-player (PowerDVD, WinDVD, etc.).
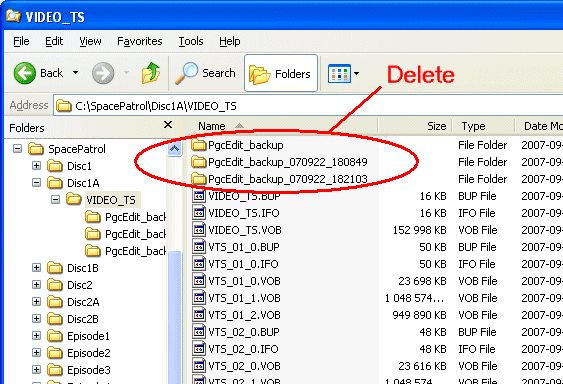
Before burning to disc, delete the backup folders that PgcEdit has left in the C:\SpacePatrol\Disc1A\VIDEO_TS directory.
You may burn the DVD with your favorite software. Here's an example of how to do it with Nero Express:
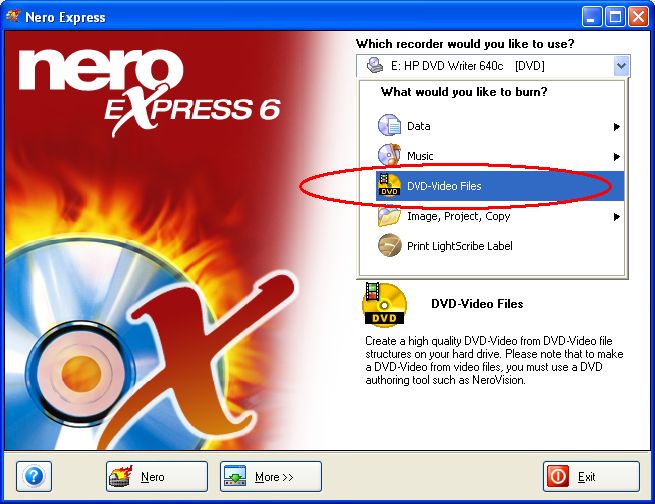
Select DVD-Video Files.
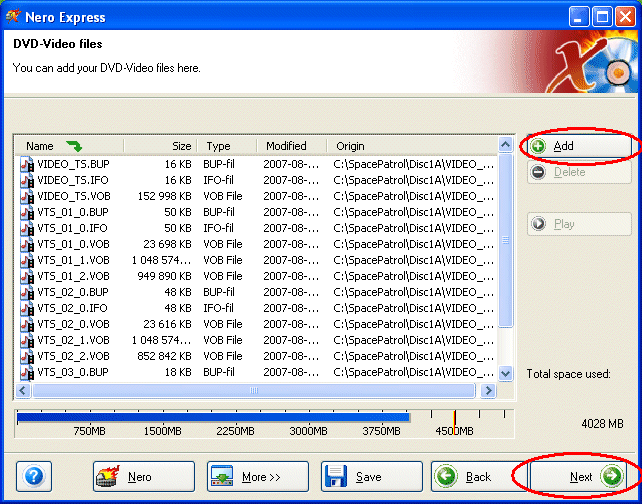
Click Add and select all the files in the c:\Spacepatrol\Disc1A\VIDEO_TS folder. Click Next and (in the next screen) Burn.
Preparing Disc1B
As we begin, the Disc1B folder should contain a complete copy of the first Space Patrol Orion DVD with the first four subtitled episodes. We will now strip it down to include only episodes three and four.Download the zip-archive Disc1B.zip and extract its contents into the C:\SpacePatrol\Disc1B folder.
Launch the PgcEdit program. Click the Open DVD button, navigate to C:\SpacePatrol\Disc1B\VIDEO_TS and click OK.
Click Yes if you get a message about "number of audio streams".
Wait for the BOVs finder to finish, then click Close.
In the File menu select Menu buttons & BOVs / Import all Menu Buttons and BOVs.
Navigate to C:\SpacePatrol\Disc1B\disc1b.but and click Open.
In the File menu select PGC Commands / Import all PGC commands.
Click Yes to acknowledge the warning message.
Navigate to the C:\SpacePatrol\Disc1B folder and click OK.
In the DVD menu select Delete Uncalled TitleSets (Fast!).
If you have done everything correctly, PgcEdit will now volunteer to delete two titlesets, numbers 1 and 2. If not, go back and check that you have done all the steps exactly as described. If everything looks fine, click OK.
Click OK to acknowledge the progress message.
You will now get a series of messages asking about backup of the .VOB-files. There shouldn't be any reason to back things up here, so click No in response to each message.
Wait for the BOVs finder to finish, then click Close.
Click OK to acknowledge the progress message. You may now close the PgcEdit program. We're almost done, and you may want to check the results with some PC-based DVD-player (PowerDVD, WinDVD, etc.).
Delete the backup folders that PgcEdit has left in the C:\SpacePatrol\Disc1B\VIDEO_TS directory. Burn the DVD with your favorite DVD burning software, for example Nero Express.
Preparing Disc2A
As we begin, the Disc2A folder should contain a complete copy of the second Space Patrol Orion DVD with the subtitled episodes 5 through 7. We will now strip it down to include only episodes five and six.Download the zip-archive Disc2A.zip and extract its contents into the C:\SpacePatrol\Disc2A folder.
Launch the PgcEdit program. Click the Open DVD button, navigate to C:\SpacePatrol\Disc2A\VIDEO_TS and click OK.
Click Yes if you get a message about "number of audio streams".
Wait for the BOVs finder to finish, then click Close.
In the File menu select Menu buttons & BOVs / Import all Menu Buttons and BOVs.
Navigate to C:\SpacePatrol\Disc2A\disc2a.but and click Open.
In the File menu select PGC Commands / Import all PGC commands.
Click Yes to acknowledge the warning message.
Navigate to the C:\SpacePatrol\Disc2A folder and click OK.
In the DVD menu select Delete Uncalled TitleSets (Fast!).
If you have done everything correctly, PgcEdit will now volunteer to delete several titlesets, numbers 3, 4, 5 and 7. If not, go back and check that you have done all the steps exactly as described. If everything looks fine, click OK.
Click OK to acknowledge the progress message.
You will now get a series of messages asking about backup of the .VOB-files. There shouldn't be any reason to back things up here, so click No in response to each message.
Wait for the BOVs finder to finish, then click Close.
Click OK to acknowledge the progress message. You may now close the PgcEdit program. At this point you may want to check the results with some PC-based DVD-player (PowerDVD, WinDVD, etc.).
Before continuing, please delete the backup folders that PgcEdit has left in the C:\SpacePatrol\Disc2A\VIDEO_TS directory.
You may notice that even though we have stripped down the contents to include only two episodes, they are still too large to fit on a single layer disc. So we will have to bring them down to size. We can do that with DVD Shrink, so let's launch that program. Please note that DVD Shrink is only required for Disc2A, not for the other three discs.
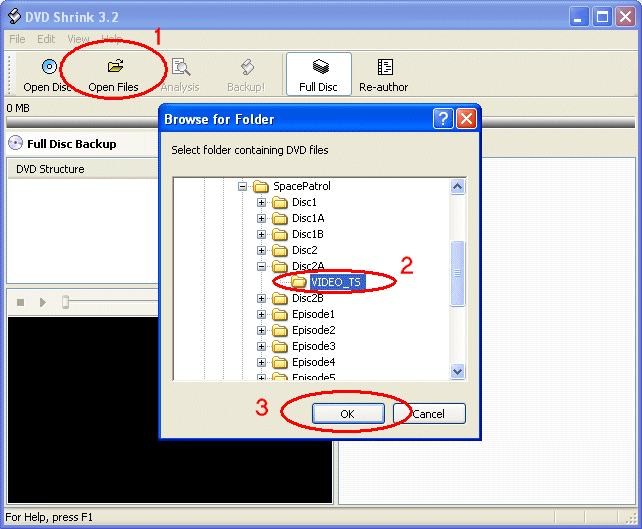
Click Open Files (1), navigate to the C:\SpacePatrol\Disc2A\VIDEO_TS folder (2) and click OK (3).
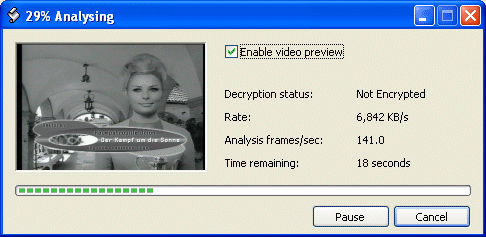
Wait for the quick analysis to finish.
Click Analysis.
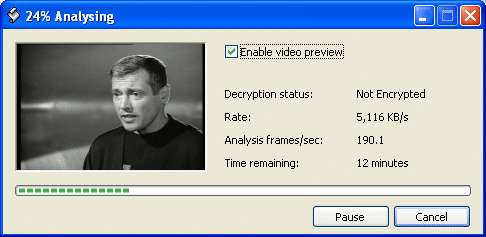
Even though it looks much the same as the previous step, the deep analysis will take considerably longer. Wait for it to finish.
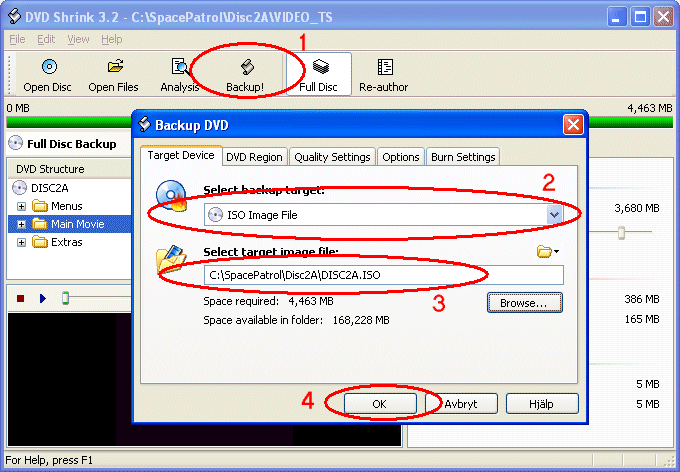
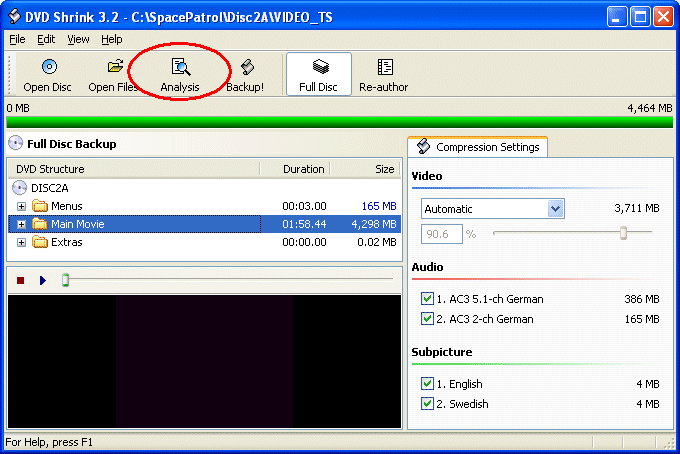
Click Backup! (1). Select target (2). If you have Nero installed, you may choose to burn directly to disc, but be warned that it doesn't work with all versions of Nero. A more reliable way is to create an .ISO file and burn separately with Nero or other program. Select a folder of your choice for the target/temporary files (3) and click OK (4).
You can now burn the .ISO-file with Nero Express like this:
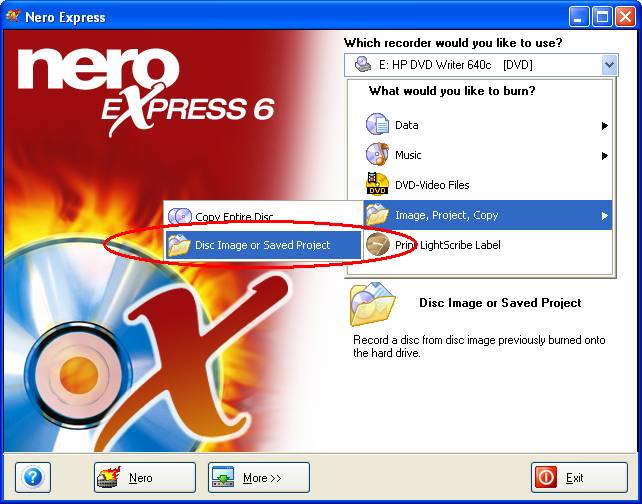
Select Image, Project, Copy / Disc Image or Saved Project. Navigate to the .ISO-file you created with DVD Shrink.

Insert an empty disc and click Next.
Preparing Disc2B
As we begin, the Disc2B folder should contain a complete copy of the second Space Patrol Orion DVD with the subtitled episodes 5 through 7. We will now strip it down to include only episode seven and all the extras.Download the zip-archive Disc2B.zip and extract its contents into the C:\SpacePatrol\Disc2B folder.
Launch the PgcEdit program. Click the Open DVD button, navigate to C:\SpacePatrol\Disc2B\VIDEO_TS and click OK.
Click Yes if you get a message about "number of audio streams".
Wait for the BOVs finder to finish, then click Close.
In the File menu select Menu buttons & BOVs / Import all Menu Buttons and BOVs.
Navigate to C:\SpacePatrol\Disc2B\disc2b.but and click Open.
In the File menu select PGC Commands / Import all PGC commands.
Click Yes to acknowledge the warning message.
Navigate to the C:\SpacePatrol\Disc2B folder and click OK.
In the DVD menu select Delete Uncalled TitleSets (Fast!).
If you have done everything correctly, PgcEdit will now volunteer to delete two titlesets, numbers 1 and 2. If not, go back and check that you have done all the steps exactly as described. If everything looks fine, click OK.
Click OK to acknowledge the progress message.
You will now get a series of messages asking about backup of the .VOB-files. There shouldn't be any reason to back things up here, so click No in response to each message.
Wait for the BOVs finder to finish, then click Close.
Click OK to acknowledge the progress message. You may now close the PgcEdit program. We're almost done, and you may want to check the results with some PC-based DVD-player (PowerDVD, WinDVD, etc.).
Delete the backup folders that PgcEdit has left in the C:\SpacePatrol\Disc2B\VIDEO_TS directory. Burn the DVD with a DVD burning software of your choice, for example Nero Express.
Go back to Space Patrol Orion Subtitles Main Page.
Go back to Part 1.
Go back to Part 2.
Webmonster: Anders M Olsson
Page updated 2007-09-02